
Well, I did my first “field repair”. It’s between brackets because, to be honest, it was not literally in the field, but on a hotel compound. Still, I did it completely by myself with the tools I took with me.
So, what was going on? For some time now, when starting the engine for the first time during the day, it would start squeaking after about 5 seconds, and then it would stop making the noise after about 2 minutes. it sounded like the squeak of a v-belt, but not quite the same. making the right diagnose is usually the hardest part, and this this case was no exception. It took a long time to figure out where it came from, and then I still found it by accident.


I already concluded that it were not the v-belts because I had replaced them with some original ones before we left the Netherlands and the sound was still there. I decided to wait some time and see if it would worsen or disappear, hoping for the latter of course. Well, two weeks ago it started to get worse.. after checking with the L300benelux knowledge base, the bearings of alternator, steering pump or water pump were suspected. So while staying on a mountain meadow I took off the v-belts, and turned them by hand but all felt smooth, not grainy or anything.. then what? Not knowing what was next, I started touching some parts and fiddling around. then I noticed that the crankshaft pulley had some play.. I could move it about 3-4mm axially. Why?
officially it is called harmonic balancing crankshaft pulley. It is constructed in such a way that the inner ring is isolated from the outer v-ring by means of a rubber layer. The rubber layer started to come loose, which meant that the v-ring can move axially. That is not good.
We already drove 3000kms since the sound appeared. I felt confident enough that we could drive a little while more before failure. (remember, the sound disappeared after a minute or two, each day).
The plan of action to repair it was to go to Tirane, visit a car parts shop (Japan Goni Parts) and then find a garage for support. But the traffic in Tirane is horrific, so when I finally got to the car parts shop, I was in no mood to search for a garage that day. To get the part was absolutely no problem, I could even choose between two (aftermarket) brands.


To visit the city center of Tirana, we decided to stay at a hotel compound with our camper. I noticed there was at least one “auto servis” around every corner, and I found out that within 500m of the hotel there were already three garages to choose from. So I checked them out to see if we could communicate in either English or German, and asked them if they could help me when needed, since I thought I would be missing a crucial piece of tooling.
It worked out fine, and did not even need the garage for additional help.
Replacing the crankshaft pulley
removing the crankshaft pulley is not a difficult job, but since it is mounted with 170-190Nm, it requires force and enough room to work. Therefore the fan and -of course- the v-belts need to be removed. Notice that these pictures are taken from a 4D56 diesel without air conditioning.

Sockets 12, 14 and 19mm, wrenches, size 10, 12 and 14mm, torque wrench, piece of straight bar (glue clamp in my case) paint marker.
Mark the direction of v belt rotation and also groove position, just to be safe. mark the fan clutch bolt position relative to the v-pulley for easier re-assembling.


release both 12mm bolts (hinge and blocking bolt) that tension the steering pump and unhook the v-belt. Then release the 14mm bolt below the alternator, then remove the tensioner that is above the alternator (2x 12mm bolt) and unhook both v-belts.


with all v-belts hanging loose behind the fan, it is time to remove the fan to make it possible to access the 19 mm bot of the crankshaft pulley. I used a piece of straight bar to block the rotation of the fan. this makes it possible to remove the 10mm bolts. Just hook the straight bar behind a 10mm head and the fan shaft, then, on opposite side, use a 10mm wrench to release a bolt.
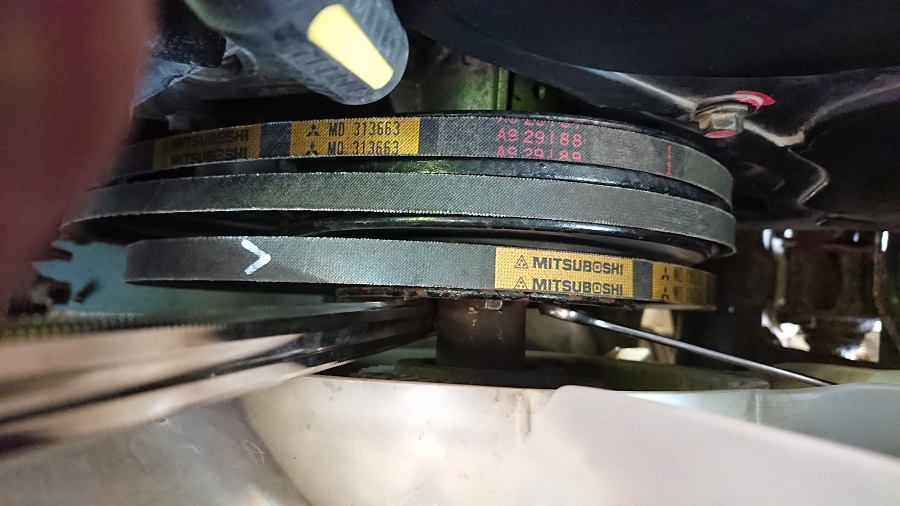
And when the fan is removed, put the transmission in fourth gear, apply the handbrake and perhaps use some chocks. The 19mm bolt of the crankshaft pulley is tightened to 170-190Nm, so you need considerable force to release it: I use the torque wrench also to release it, set to the expected force (190Nm) to know if I am not exerting too much force. The bolt has normal thread, so counter clockwise to release.

When assembling, use a pinch of grease on the crankshaft to aid in future disassembly. This is also true for all bolt threads: use a little bit of grease to avoid corrosion. When putting tension on the v-belts, don’t overdo it, they may be pushed in about 12-14mm. When having the desired tension, first tighten the blocking bolt, then the hinge bolt. (for both steering pump and alternator).


Knap dat je dat hebt gevonden en gemaakt. Gelukkig bij een grote stad in de buurt.
Nu maar hopen dat dat voorlopig het laatste was. Maar zie ik daar wat roest aan het chassis? Niks ernstigs? Prettige voortzetting in ieder geval. Leo
niks ernstigs. en ‘t was te verwachten dat vroeg of laat iets vervangen moet worden.
Een tijd geleden had ik het zelfde probleem. Toen scheurde het rubber helemaal en viel de pulley er tijdens het rijden af.
had je toen nog bijkomende schade of viel het mee? in mijn geval kondigde het euvel zich in ieder geval aan als een gepiep, vergelijkbaar met een v-snaar.
I signed up to your rss feed! Will you post much more about this theme? Precisely what I required to get. Really clear and valuable post. Im certainly a violator of many of these guidelines.